
Your water heater is one of the hardest-working appliances in your home, but inside it, there’s a simple part doing a thankless job. It’s called an anode rod, and its entire purpose is to sacrifice itself by corroding away so the steel tank doesn’t. When this rod is gone, your tank becomes vulnerable to rust, leaks, and catastrophic failure. This guide is all about proactive maintenance. We’ll show you how a straightforward water heater anode rod replacement can double the life of your unit, saving you from a cold shower and the massive expense of an emergency replacement. It’s one of the smartest, most cost-effective DIY projects you can do.
Key Takeaways
- The Anode Rod is Your Tank’s Bodyguard: This sacrificial part is designed to corrode so your water heater tank doesn’t. Regularly replacing it is the single most effective way to prevent internal rust, leaks, and premature tank failure.
- Watch for Telltale Signs: Plan to inspect your anode rod every couple of years and replace it every 4-5 years. If your hot water suddenly smells like rotten eggs or looks rusty, it’s a clear signal that the rod is gone and your tank is unprotected.
- Use the Right Tools or Call for Help: A stuck rod is the most common challenge and often requires an impact wrench for removal. If you don’t have the right equipment or the job feels overwhelming, calling a professional is the safest way to protect your investment.
What’s a Water Heater Anode Rod (And Why Should You Care)?
Inside your water heater, there’s a simple but essential component working hard to protect your investment: the anode rod. Think of it as a bodyguard for your water heater tank. This metal rod is specifically designed to corrode, or rust away, so the steel tank itself doesn’t have to. It’s a sacrificial process where the more reactive metals of the anode rod attract corrosive elements in the water, taking the hit for the team.
Why should you care about this humble metal stick? Because it’s one of the most important factors in determining how long your water heater lasts. A healthy anode rod prevents the tank from rusting from the inside out, which can lead to catastrophic leaks, water damage, and the sudden, expensive need for a new unit. Regularly checking and replacing this part is one of the most effective pieces of preventative maintenance you can do. It’s a small task that helps you avoid a major hot water heater repair bill down the road.
How Anode Rods Protect Your Tank
The anode rod’s job is to be the first line of defense against corrosion. As it slowly dissolves, it protects the exposed steel of your tank. But this sacrificial process means the rod has a limited lifespan. Once the anode rod is completely gone, the corrosive elements in your water will immediately begin to attack the tank walls. This corrosion eventually leads to pinhole leaks that can quickly turn into a major flood in your basement or utility closet.
Replacing the anode rod is a proactive step that helps your water heater last much longer and greatly reduces the chance of it leaking. A simple inspection every few years can tell you how much life your rod has left. If it’s pencil-thin or covered in calcium buildup, it’s time for a new one. This small part is your best insurance against a premature and costly water heater installation.
Your Anode Rod Options
When it’s time for a replacement, you’ll find a few different types of anode rods to choose from. The most common are made from aluminum or magnesium, which are both effective for most water conditions. However, if you notice a rotten egg or sulfur smell coming from your hot water, a zinc-alloy anode rod is a great choice, as the zinc helps neutralize the bacteria that cause the odor.
For a more advanced, long-term solution, you might consider a powered anode rod. Instead of sacrificing itself, this type of rod uses a small electrical current to stop corrosion. It can last for the entire life of your water heater and is highly effective at eliminating sulfur smells and reducing limescale buildup. While it requires a nearby electrical outlet, it’s a fantastic set-it-and-forget-it option for ultimate tank protection.
Signs It’s Time for a New Anode Rod
Your water heater is pretty good at telling you when something’s wrong—you just have to know what to look for. While it might seem like a big, mysterious tank, many common issues point to one small, hardworking part: the anode rod. Think of it as the tank’s personal bodyguard. Its entire job is to corrode so the steel tank itself doesn’t. But eventually, this bodyguard wears out, and when it does, your water heater will start sending out some clear distress signals.
Ignoring these signs can lead to rust, leaks, and eventually, the need for a complete replacement. Catching them early, however, can save you a lot of money and hassle. If you notice any sudden changes in your hot water, it’s a good idea to investigate. A failing anode rod is often the culprit behind strange smells and discolored water, and it’s a relatively simple fix compared to the alternative. If you suspect a problem, getting a professional opinion on your hot water heater repair can extend the life of your unit significantly.
What to Look For
Paying attention to your water is the first step in diagnosing a worn-out anode rod. The signs are usually hard to miss once you know what they are. The most obvious clue is a change in the quality of your hot water. Is it starting to smell strange? Does it look a little off-color? These aren’t just minor annoyances; they’re direct indicators that the inside of your water heater tank is no longer protected from corrosion. By keeping an eye (and nose) out for these changes, you can address the problem before it escalates into a much bigger issue, like a tank failure.
Smelly or Discolored Water
Have you ever turned on your hot water tap and been hit with the smell of rotten eggs? That distinct sulfur smell is one of the most common signs of a failing anode rod. This happens when the rod, typically made of magnesium or aluminum, reacts with sulfates in the water to create hydrogen sulfide gas. If you notice the smell only comes from your hot water, the anode rod is almost certainly the cause. This isn’t just an unpleasant odor; it’s a warning that your tank’s primary defense against rust is gone, which can eventually lead to a serious water leak repair.
Hot Water Problems
Beyond just a bad smell, a depleted anode rod can cause other noticeable hot water issues. If your hot water comes out looking rusty, brown, or filled with sediment, it’s a major red flag. This discoloration means the inside of your steel water tank has started to corrode and flake away. You might also notice an unusual or metallic taste. These are signs that your water heater is on the fast track to failure. Addressing the anode rod promptly can stop the corrosion in its tracks, saving you from the expense and headache of premature water heater installations.
How Often Should You Replace Your Anode Rod?
Knowing when to replace your anode rod is key to keeping your water heater running efficiently for years. While it’s easy to want a simple, set-it-and-forget-it schedule, the truth is that the lifespan of an anode rod depends on a few different things, like your water quality and how much you use your hot water. Think of it less like a strict deadline and more like a health check-up for your water heater. Paying attention to a general timeline and a few key factors will tell you everything you need to know about when it’s time for a swap. This proactive approach is one of the best ways to prevent a premature and costly water heater installation.
A General Replacement Timeline
As a solid rule of thumb, you should plan to inspect your anode rod every one to two years. This quick check will give you a clear picture of how it’s holding up. The goal is to replace it every four to five years, or sooner if it’s wearing down quickly. What are you looking for during an inspection? If the rod is about half as thick as it was when it was new, or if it’s so corroded it looks like a thin, pitted wire, it’s time for a new one. Staying on top of this schedule helps you avoid the kind of internal tank corrosion that leads to leaks and bigger hot water heater repair bills down the road.
What Makes an Anode Rod Wear Out Faster?
Certain conditions can make your anode rod work overtime, causing it to wear out much faster than average. A major factor is your water quality. If you use a water softener, for instance, the softened water can be more aggressive and speed up corrosion, meaning you might need to check your rod more frequently. Another tell-tale sign is a sulfur or “rotten egg” smell coming from your hot water. This is often caused by a chemical reaction between the anode rod and sulfates in the water, which creates hydrogen sulfide gas and eats away at the rod. Your water source, whether it’s from a well or the city, also plays a role in how quickly the rod deteriorates.
Gather Your Tools and Materials
Before you get started, let’s make sure you have everything you need for a smooth replacement. Taking a few minutes to gather your supplies now will save you from making extra trips to the hardware store later. Think of it as setting up your workspace for success. Having the right tools not only makes the job easier but also safer.
The Essential Tool Checklist
That old anode rod can be surprisingly stubborn to remove, so you’ll need some muscle. A long breaker bar or an impact wrench will give you the leverage you need to loosen it. If you don’t have an impact wrench, you can often rent one from a local tool shop. You’ll also need a 1-1/16 inch deep impact socket to fit the hex head on the anode rod. Having these specific tools on hand is the key to getting the old rod out without a struggle.
Don’t Forget Your Safety Gear
This is a simple step, but it’s one you should never skip. When you’re working with tools, especially a powerful one like an impact wrench, protecting yourself is the top priority. Grab a pair of safety glasses or goggles before you begin. This will shield your eyes from any small bits of sediment or rust that might fly out when you loosen the old rod. It’s a quick and easy way to prevent a serious injury, so make sure your eye protection is on from start to finish.
How to Pick the Right Replacement Rod
Not all anode rods are created equal, and the right one for you depends on your water and your space. If you’re dealing with water that has a sulfur or rotten egg smell, a zinc-alloy anode rod can help neutralize the odor. For homes with limited overhead space above the water heater, a flexible or segmented anode rod is a game-changer. These rods can be bent or folded as you guide them into the tank, making installation possible even in tight closets or basements. Choosing the right rod ensures your new one will perform well and fit correctly. If you run into trouble or find your tank has other issues, our team is always ready to help with hot water heater repair.
How to Replace Your Anode Rod: A Step-by-Step Guide
Ready to tackle this yourself? It’s a totally manageable DIY project that can save you a lot of money and extend the life of your water heater. Just follow these steps carefully, and you’ll be done in no time.
Step 1: Shut Off Power and Water
Safety first—always. Before you touch a single tool, you need to cut the power and water supply to your heater. For an electric model, head to your breaker box and flip the circuit that controls the water heater. If you have a gas heater, turn the control dial to the “Pilot” setting. Next, find the cold water shut-off valve, which is usually a handle or knob on the pipe leading into the top of your tank. Turn it clockwise until it stops. This step is absolutely critical to prevent electrical shock or a major water mess. If you’re ever unsure about your home’s plumbing or electrical systems, it’s always best to call for professional hot water heater repair.
Step 2: Drain the Tank and Find the Rod
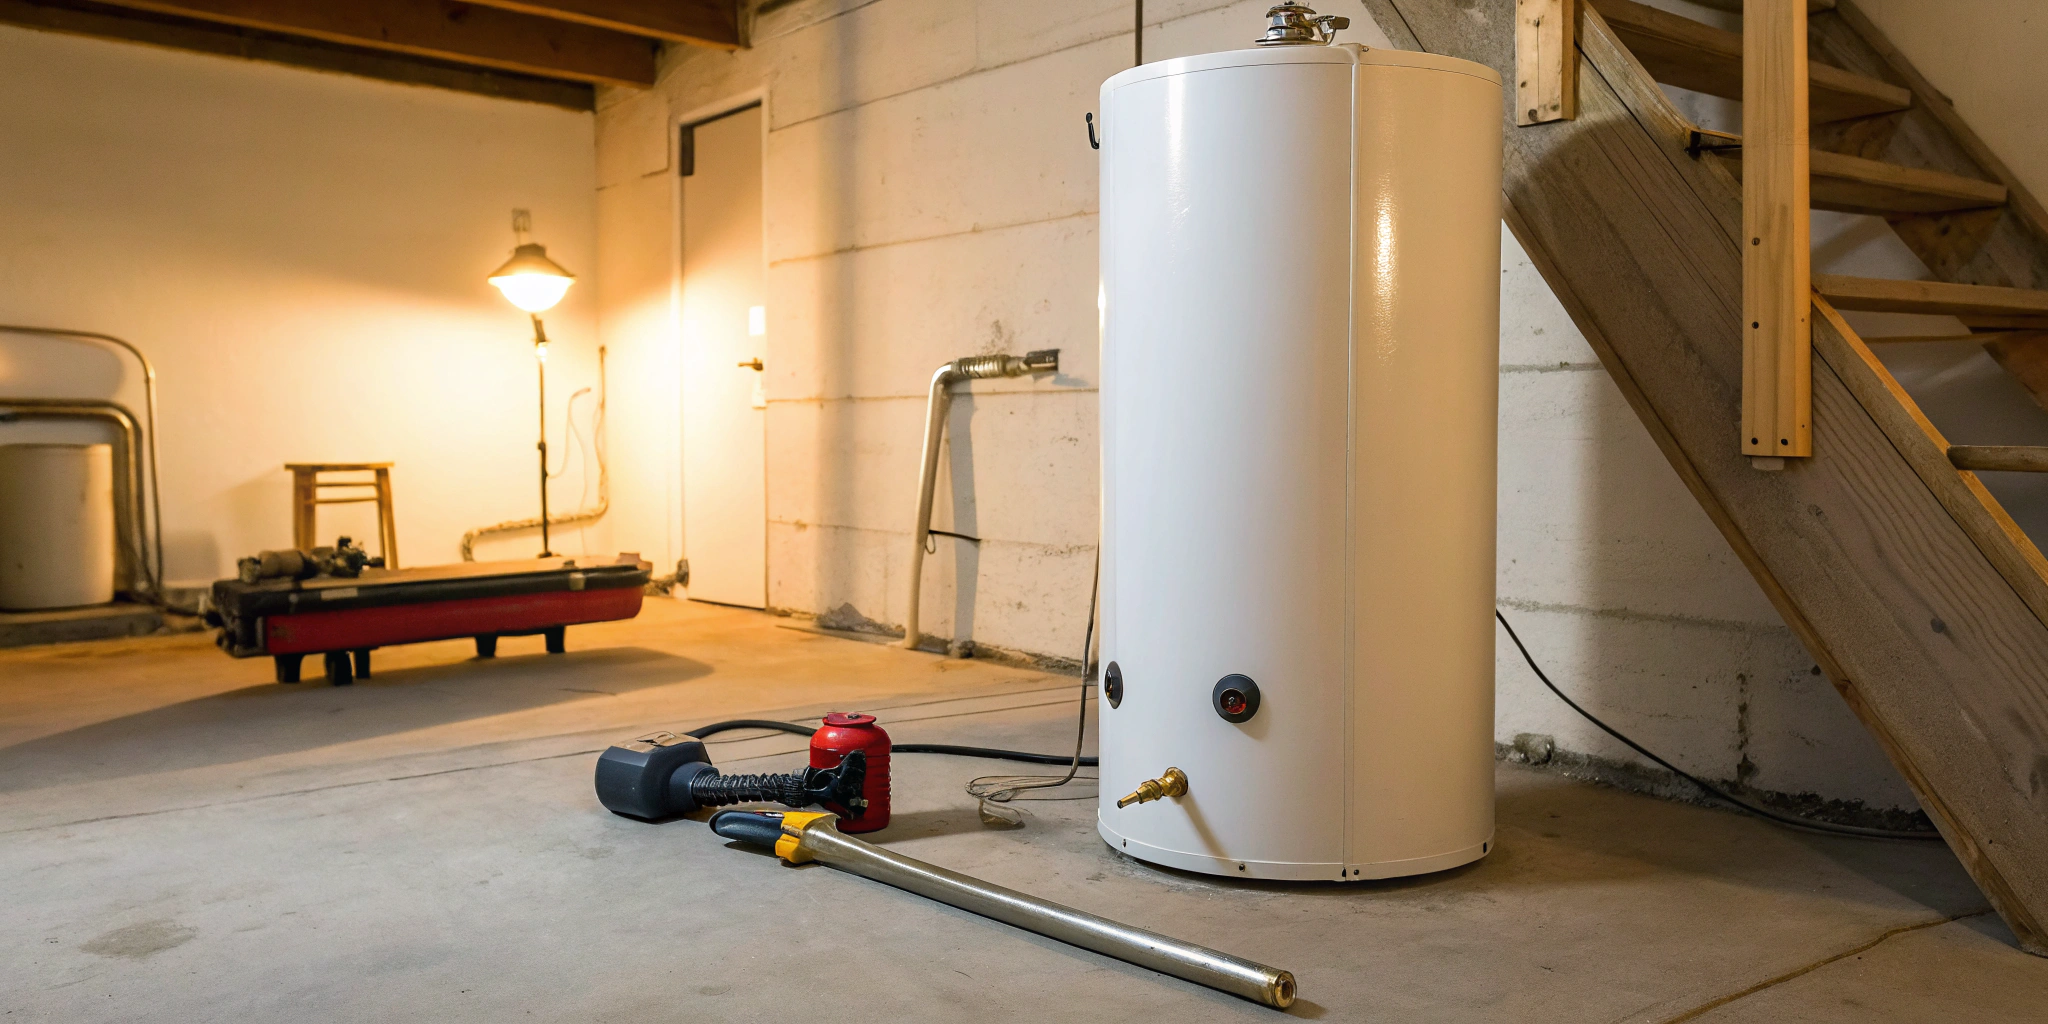
Now, you’ll need to drain a bit of water to relieve the pressure inside the tank. Grab a garden hose and attach it to the drain valve near the bottom of the heater. Run the other end of the hose to a floor drain or outside. To help the water flow, open a hot water faucet somewhere in your house—this lets air into the system. You don’t need to empty the entire tank; draining just a few gallons is enough. While it’s draining, locate the anode rod. It’s almost always on the top of the water heater, sometimes hidden under a plastic cap. You’re looking for a large hex-head nut, which is part of the rod itself.
Step 3: Remove the Old Anode Rod
This can be the toughest part of the job. Using a 1 1/16-inch socket and a long-handled ratchet or breaker bar, fit the socket over the hex head and turn it counter-clockwise. Be prepared to use some muscle, as years of corrosion can make it incredibly tight. It helps to have a friend hold the tank steady so it doesn’t shift while you’re pulling. If it just won’t budge, an impact wrench can make quick work of it. Once it breaks free, you can unscrew it the rest of the way and lift the old rod out. Don’t be surprised if it looks gnarly—that means it did its job! This is a key part of regular residential plumbing maintenance.
Step 4: Install the New Anode Rod
With the old rod out, it’s time to prep the new one. Take some Teflon tape (also called plumber’s tape) and wrap it clockwise around the threads of the new anode rod three or four times. This creates a watertight seal. Carefully guide the new rod into the opening on the tank. It’s very important to thread it in by hand at first to ensure it isn’t cross-threaded, which could damage the tank permanently. Once you’re sure it’s threaded correctly, use your socket wrench to tighten it until it’s snug. You want it to be secure, but there’s no need to overtighten and risk stripping the threads.
Step 5: Refill the Tank and Check for Leaks
You’re on the home stretch! First, make sure the drain valve at the bottom of the tank is closed, and remove your hose. Slowly turn the cold water supply valve back on. Go back to the hot water faucet you opened earlier and let it run. You’ll hear some sputtering as air is pushed out of the lines. Once you have a steady stream of water, the tank is full, and you can turn the faucet off. Now, do a final, careful check for any drips or moisture around the new anode rod fitting. If everything is bone dry, you can safely restore power to the heater. If you spot a leak, you may need professional water leak repair to sort it out.
Common Problems You Might Encounter
Even with a perfect plan, replacing an anode rod can throw you a curveball. It’s one of those home maintenance tasks that seems straightforward until you’re halfway through and a stubborn part refuses to cooperate. Don’t worry—most of these issues are common, and there are ways to work through them. The key is to anticipate the challenges so you can have the right tools and techniques ready to go.
From rods that are practically welded in place by corrosion to workspaces that feel like a closet, we’ve seen it all. Knowing how to handle these situations can be the difference between a successful DIY project and a frustrating afternoon. Before you get started, it’s a good idea to understand these potential hurdles. If you run into a problem that feels beyond your skill set or tool collection, remember that our team is always ready to help with any hot water heater repair you might need. Let’s walk through a few of the most frequent challenges you might face.
Handling a Stuck or Corroded Rod
Let’s be honest: the hardest part of this job is usually getting the old anode rod out. Over the years, corrosion and sediment can cause the rod to seize up, making it feel impossible to unscrew. If you put all your muscle into it with a standard wrench, you risk damaging the tank or the hex head on the rod itself. This is where an impact wrench becomes your best friend. Using one in short, controlled bursts can break the rod free without too much strain. This method provides the necessary torque to loosen the connection that years of corrosion have created.
Working in a Tight Space
Many water heaters are tucked away in basements, closets, or utility rooms with very little overhead clearance. This presents a problem when you try to pull out a four-foot-long anode rod. If you don’t have enough room, you have a couple of options. You can carefully bend the old rod as you pull it out or even cut it into smaller pieces with a hacksaw. For the replacement, look for a flexible, segmented anode rod. Often called a “nunchuck style” rod, it’s designed to be installed in sections, making it perfect for water heater installations in tight quarters.
When to Use an Impact Wrench
A standard socket wrench sometimes just doesn’t have enough power to remove a stubborn anode rod. If you’re struggling, an impact wrench is the tool to use. It delivers high torque in rapid succession, which is far more effective at breaking a seized rod loose than steady pressure. To do this safely and effectively, you’ll need an impact-rated socket that fits the anode rod’s hex head—typically 1 1/16-inch. Using the right tool not only makes the job easier but also prevents you from stripping the nut or damaging your water heater, ensuring your residential plumbing stays in top shape.
Choose the Best Anode Rod for Your Water Heater
Okay, you’re ready to swap out that old anode rod. Now for the important part: picking the right replacement. It might seem like a minor choice, but the type of rod you install directly impacts your water heater’s health and longevity. The material and style you choose can prevent corrosion more effectively and even solve common water issues. Let’s walk through the main options so you can feel confident you’re making the best decision for your home.
Magnesium vs. Aluminum: What’s the Difference?
When you start shopping, you’ll mainly see magnesium and aluminum rods. Think of magnesium as the premium choice—it provides superior protection against corrosion, especially if you have soft water. However, if your hot water has a rotten egg smell, an aluminum rod isn’t the answer. That sulfur smell is a common headache, and an aluminum-zinc alloy rod is specifically designed to combat it. If the odor problem is particularly stubborn, a powered anode rod is your best bet. But if you don’t have an outlet nearby, the aluminum-zinc rod is a solid second choice to clear the air and keep your tank safe from rust.
Flexible Rods for Tight Spaces
Is your water heater tucked into a closet or under a low ceiling? If you don’t have enough overhead clearance to pull out a long, rigid rod, don’t worry. A flexible anode rod is the perfect solution. These rods are made of several shorter segments linked by a flexible wire, kind of like nunchucks. This design allows you to bend the rod and feed it into the tank piece by piece, making installation possible even in the most cramped spaces. It saves you the hassle of trying to create extra room and makes a tricky job much more manageable.
Is a Powered Anode Rod Worth It?
If you’re looking for a long-term, low-maintenance solution, a powered anode rod is worth considering. Unlike traditional rods that sacrifice themselves to protect the tank, a powered rod uses a small electrical current to stop corrosion before it starts. It doesn’t dissolve over time, so you won’t have to replace it every few years. While the upfront cost is higher, it can save you money in the long run by significantly extending the life of your tank and preventing the need for a premature water heater installation. Just remember, it requires a nearby electrical outlet to function.
Avoid These Common Replacement Mistakes
Replacing an anode rod is a totally manageable DIY project, but a few common missteps can turn a simple task into a major headache. Knowing what to watch out for ahead of time can save you from a frustrating afternoon and a potential call for an emergency repair. Let’s walk through the mistakes we see most often so you can get the job done right the first time.
Forgetting to Turn Off Power or Water
This is the most critical step, and it’s non-negotiable. Before you even think about touching your water heater, you must cut off its power source. For an electric model, head to your breaker box and flip the switch connected to the water heater. If you have a gas heater, you’ll need to turn the gas supply valve to the “off” position. Forgetting this step is incredibly dangerous and can lead to serious injury. Always double-check that the power and water are off before you begin. Your safety is always the top priority.
Cross-Threading or Improper Sealing
When you’re ready to install the new anode rod, it’s easy to accidentally cross-thread it, which is like trying to screw a cap on a bottle crookedly. It damages the threads on both the rod and the tank, preventing a secure fit and leading to leaks. To avoid this, always start screwing the new rod in by hand for the first few turns to ensure it’s aligned correctly. Also, be sure to wrap the threads of the new rod with Teflon tape or pipe sealant. This simple step creates a watertight seal and prevents frustrating drips that could lead to a bigger water leak repair down the road.
Using the Wrong Tools or Technique
Wrestling with a stuck anode rod is no fun. Many people try to use a standard wrench and end up struggling for hours. The secret to making this job easier is using the right tool: a high-powered, 1/2-inch impact wrench with a 1-1/16 inch deep impact socket. This tool provides the torque needed to break a stubborn, corroded rod free in seconds. If you don’t have one, you might be in for a fight. Using the wrong tool can not only waste your time but also risk damaging the tank. If the rod won’t budge, it might be time to call for a professional hot water heater repair.
Know When to Call a Professional
There’s a special kind of satisfaction that comes from a successful DIY project. But there’s also a unique frustration when a project goes sideways, especially with plumbing. While replacing an anode rod can be a manageable task, it’s important to know your limits. Your water heater is a major appliance, and a mistake can lead to leaks, damage, or even the need for a full replacement.
Sometimes, the smartest move is to call in a professional. It’s not about admitting defeat; it’s about protecting your home and your investment. A professional plumber has the experience, the right tools, and the knowledge to ensure everything is working safely. If you find yourself feeling overwhelmed or just aren’t confident from the start, there’s no shame in handing the wrench over to an expert. A quick service call for a hot water heater repair can save you a world of headaches.
If You’re Unsure or Lack the Right Tools
Confidence is key in any DIY project, but so is having the right equipment. Replacing an anode rod can be a relatively simple job if you have the proper tools, like a long breaker bar and the correct socket. Without them, the difficulty level can skyrocket. If you’re trying to make do with a standard wrench set, you might not get enough leverage to break the old rod free. Forcing it with the wrong tools can strip the hex head or damage the tank. Before you start, honestly assess your toolbox and your comfort level. If you’re hesitant or need to buy several specialized tools for a one-time job, calling a professional is the most practical choice.
For Complex or Stubborn Replacements
Sometimes, you do everything right and still run into a wall. Anode rods can become so corroded and calcified that they seem fused to the tank, making removal the biggest challenge of the job. In other cases, you might find the rod is too long to pull out due to low ceiling clearance. A professional has tricks for these situations, from using a powerful impact wrench to cutting the old rod into pieces. If your water heater is in a tight closet, a pro has the experience to work in cramped quarters or even move the tank if necessary. When you encounter these stubborn issues, it’s a good sign to seek professional help.
Related Articles
- Find the Best Hot Water Heater Repair Service: A Guide
- Hot Water Heater Repair Spokane WA | Same Day Service
- 5 Warning Signs You Need a New Water Heater
- Tank vs. Tankless Water Heater: Pros, Cons & Costs
Frequently Asked Questions
Is it really a big deal if I don’t replace my anode rod? Yes, it’s a huge deal. Think of the anode rod as the bodyguard for your water heater’s steel tank. Once it’s gone, there’s nothing to stop corrosive elements in the water from eating away at the tank itself. This leads to rust, leaks, and eventually, a flooded basement and the need for a brand new water heater. A small, inexpensive part prevents a very large, expensive problem.
My hot water smells like rotten eggs. Is the anode rod the problem? It’s very likely the culprit, especially if the smell only comes from your hot water taps. That distinct sulfur odor is often caused by a reaction between the anode rod (usually magnesium) and sulfates in your water. Switching to an aluminum-zinc alloy rod is specifically designed to neutralize this reaction and get rid of the smell for good.
How do I know which type of anode rod to buy? The right rod depends on your water. For most homes with normal water, a standard magnesium or aluminum rod works perfectly well. If you have that rotten egg smell, you’ll want an aluminum-zinc alloy rod. And if you’re looking for a long-term, set-it-and-forget-it solution, a powered anode rod is a great investment that stops corrosion using a small electrical current instead of sacrificing itself.
What if I don’t have enough space above my water heater to pull the old rod out? This is a super common problem, but there’s a simple solution. You’ll want to buy a flexible or segmented anode rod. These are designed like nunchucks, with shorter metal segments connected by a flexible wire. This allows you to bend the rod and feed it into the tank opening, making it possible to install even in a tight closet or basement with a low ceiling.
Can I really do this myself, or should I just call a plumber? It’s definitely a manageable DIY project if you’re comfortable with basic plumbing and have the right tools, especially an impact wrench for a stubborn old rod. However, if you’re feeling unsure, don’t have the tools, or run into a rod that just won’t budge, calling a professional is the smartest move. It’s better to have an expert handle it than to risk damaging your tank.
